Lightweight Airflow Deployment with Docker in 5 steps
There’s a bunch of tutorials out there on how to deploy Airflow for scaling tasks across clusters. This is another one of those tutorials. However, I’m interested in doing the above without much hassle, meaning that I don’t want to spend 2 hours installing Airflow, dependencies, PostgreSQL, and so on. This tutorial extends most internet tutorials on Airflow to deploy a full-fledged example using Docker in the least amount of code possible.
For the sake of not repeating content on the internet, I’m gonna limit my definition of Airflow to this: it’s a way of repeating a program in a given interval of time, like within a specified schedule. That sounds oddly similar to cron. It is in fact a cron-like system but it has other stuff like automatic email warning when your task fails, detailed logs, scaling thousands of tasks within a cluster and an infrastructure for creating dependencies between tasks. Interested? See this.
Enough of definitions. Airflow is not particularly easy to install so let’s get to the point. At the end of this tutorial we’ll have a very simple python program that runs every minute of every single day setup on Airflow with email warning whenever this program fails. That, without having to install anything other than Docker on your local computer.
If you don’t have docker and docker-compose installed, follow this tutorial for docker and this one for docker-compose for installing both.
Summarized version
If you’re here for the code, here’s the summarized versions. Skip down for detailed explanations. Make sure you replace everything that is signaled that needs replacing.
# Replace this with the directory that you want
# to use to save your Airflow directory.
TEST_DIR=~/Downloads/

# Create the directory structure for Airflow
mkdir -p $TEST_DIR/airflow_test2
cd $TEST_DIR/airflow_test2
mkdir dags
mkdir scripts
mkdir airflow-logs

# If an 'event not found' error arises, see https://stackoverflow.com/questions/42798737/bash-usr-bin-env-event-not-found
echo -e '#!/usr/bin/env bash
airflow upgradedb
airflow webserver
' > scripts/airflow-entrypoint.sh

# Save environmental variables needed by Airflow in a separate
# .env file.
echo "AIRFLOW__CORE__LOAD_DEFAULT_CONNECTIONS=False
AIRFLOW__CORE__SQL_ALCHEMY_CONN=postgres+psycopg2://airflow:airflow@postgres:5432/airflow
AIRFLOW_CONN_METADATA_DB=postgres+psycopg2://airflow:airflow@postgres:5432/airflow
AIRFLOW_VAR__METADATA_DB_SCHEMA=airflow
AIRFLOW__SCHEDULER__SCHEDULER_HEARTBEAT_SEC=10
" > .env

# Create a docker-compose file with the container
# specification for the database, the scheduler
# and the webserver for docker.
echo "version: '2.1'
services:
  postgres:
    image: postgres:12
    environment:
      - POSTGRES_USER=airflow
      - POSTGRES_PASSWORD=airflow
      - POSTGRES_DB=airflow
    ports:
      - '5433:5432'

  scheduler:
    image: apache/airflow
    restart: always
    depends_on:
      - postgres
      - webserver
    env_file:
      - .env
    ports:
      - '8793:8793'
    volumes:
      - ./dags:/opt/airflow/dags
      - ./airflow-logs:/opt/airflow/logs
    command: scheduler
    healthcheck:
      test: ['CMD-SHELL', '[ -f /usr/local/airflow/airflow-webserver.pid ]']
      interval: 30s
      timeout: 30s
      retries: 3

  webserver:
    image: apache/airflow
    hostname: webserver
    restart: always
    depends_on:
      - postgres
    env_file:
      - .env
    volumes:
      - ./dags:/opt/airflow/dags
      - ./scripts:/opt/airflow/scripts
      - ./airflow-logs:/opt/airflow/logs
    ports:
      - '8080:8080'
    entrypoint: ./scripts/airflow-entrypoint.sh
    healthcheck:
      test: ['CMD-SHELL', '[ -f /usr/local/airflow/airflow-webserver.pid ]']
      interval: 30s
      timeout: 30s
      retries: 32
" > docker-compose.yml

# Create the task that will be ran within a schedule

# Replace `start_date` with the starting date of your process as well as the
# owner and email. Moreover, you can change `schedule_interval` for specifying
# the schedule for when you want your ask to run. For customizing additional
# arguments, see https://airflow.apache.org/docs/apache-airflow/stable/tutorial.html
echo "from datetime import timedelta, datetime
from airflow import DAG
from airflow.operators.python_operator import PythonOperator
from airflow.operators.dummy_operator import DummyOperator

# Define default arguments for the DAG
default_args = {
    'owner': 'cimentadaj',
    'depends_on_past': False,
    'start_date': datetime(2020, 12, 7, 13, 20),
    'email': ['airflow@example.com'],
    'email_on_failure': True,
    'retries': 1,
    'retry_delay': timedelta(seconds=5)
}

# Define the main DAG: this is a general
# process that can have many tasks inside
dag = DAG(
    'tutorial',
    default_args=default_args,
    schedule_interval='*/1 * * * *',
)

# Define what task_1 will do
def task_1():
    'Print task 1 complete'
    print('Task 1 complete')

# Define what task_2 will do
def task_2():
    'Print task 2 complete'
    print('Task 2 complete')

# Create initial empty task
task0 = DummyOperator(
    task_id='start',
    dag=dag
)

# Create task1
task1 = PythonOperator(
    task_id='task_1',
    python_callable=task_1,
    dag=dag
)

# Create task2
task2 = PythonOperator(
    task_id='task_2',
    python_callable=task_2,
    dag=dag
)

# Create dependencies between tasks.
# task0 is first, then task1 then task2
task0 >> task1 >> task2
" > dags/airflow-test.py

# Airflow can have some issues with permissions, so we set all
# possible permissions available for our Airflow folder.
sudo chmod -R 777 $TEST_DIR/airflow_test2

# Deploy everything
docker-compose up -d
# Creating network "airflow_test2_default" with the default driver
# Starting airflow_test2_postgres_1 ...
# Starting airflow_test2_webserver_1 ...
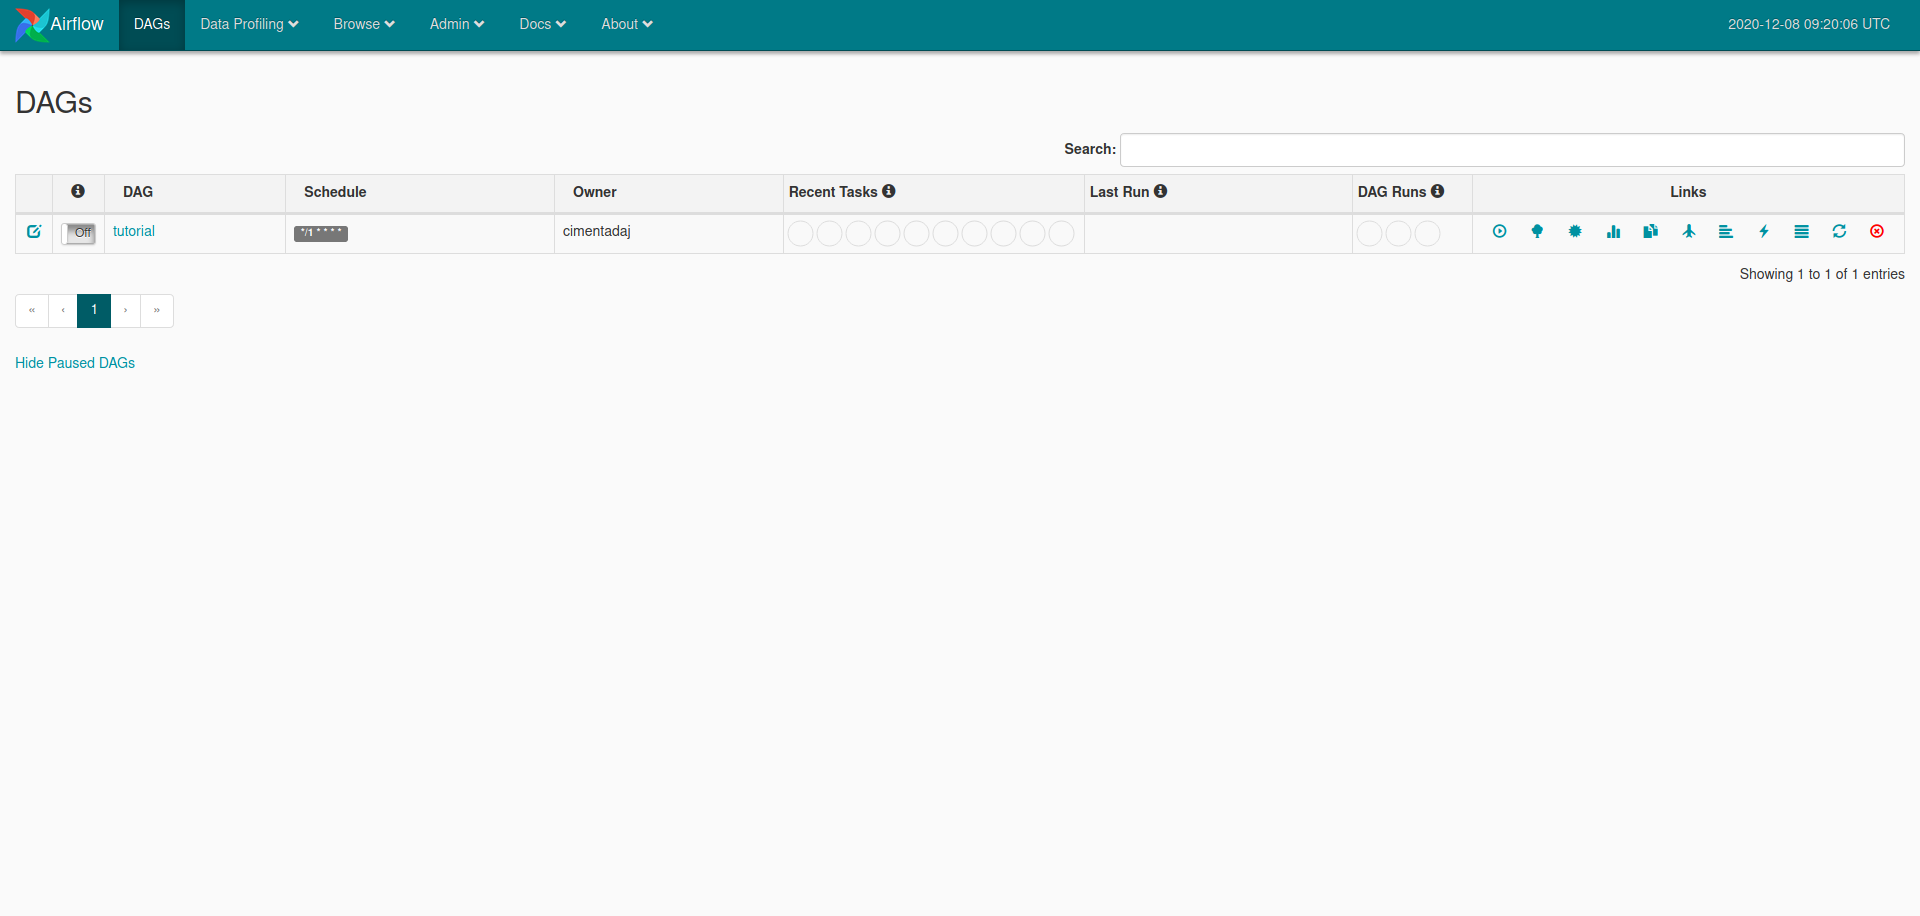
# Starting airflow_test2_scheduler_1 ... Visit http://localhost:8080/admin/ and you should see something like this:
We can toggle our tasks to begin, inspect the dependency of the different tasks and also begin the task process manually. Below is a GIF showing you how to do it. Make sure you click on the image for it to start:
Next to the dag ‘Tutorial’ (on the left) there is an Off/On slider. Swipe the slider to be ‘On’ and this task will run according to the cron expression in ‘Schedule’ (on the right of ‘Tutorial’) on the starting date that we defined in the Python script dags/airflow-test.py (just search for start_date and you’ll find it).
Detailed version
- Create the folder structure for saving our Airflow files/logs/scripts
# Replace this with the directory that you want
# to use save your Airflow directory.
TEST_DIR=~/Downloads/
mkdir -p $TEST_DIR/airflow_test2
cd $TEST_DIR/airflow_test2
mkdir dags
mkdir scripts
mkdir airflow-logs
After creating the main folder, we create three folders: dags, scripts and airflow-logs. Later on you’ll see why we need these.
- Create an entry point for the Airflow webserver.
# If an 'event not found' error arises, see https://stackoverflow.com/questions/42798737/bash-usr-bin-env-event-not-found
echo -e '#!/usr/bin/env bash
airflow upgradedb
airflow webserver
' > scripts/airflow-entrypoint.sh
The Airflow webserver is essentially the front-end of Airflow. It’s the website that you see that allows you to toggle on/off different processes, look at their logs and their schedule. In the bash script scripts/airflow-entrypoint.sh we need to ‘initialize’ that webserver. This literally just means: deploy the front-end. airflow upgradedb makes sure all tables related to the database hosting the logs, dags and so on is complete (no missing tables, for example) and airflow webserver deploys the website that we’ll use to control Airflow.
- Save all environmental variables to a file called
.env
echo "AIRFLOW__CORE__LOAD_DEFAULT_CONNECTIONS=False
AIRFLOW__CORE__SQL_ALCHEMY_CONN=postgres+psycopg2://airflow:airflow@postgres:5432/airflow
AIRFLOW_CONN_METADATA_DB=postgres+psycopg2://airflow:airflow@postgres:5432/airflow
AIRFLOW_VAR__METADATA_DB_SCHEMA=airflow
AIRFLOW__SCHEDULER__SCHEDULER_HEARTBEAT_SEC=10
" > .env
These are some of the core environmental variables that Airflow uses. For example, AIRFLOW__CORE__SQL_ALCHEMY_CONN specifies the direct connection to the back-end database hosting all the logs/dags of your Airflow instance. All of this is set with default values that can work well with this toy problem. If you’re planning to do some serious Airflow deployment then you should learn more about what these variables do for better customization. For example, in AIRFLOW__CORE__SQL_ALCHEMY_CONN we’re directly storing the user/password to access the database. This is not safe and warrants further customization.
- Write a
docker-composefile that deploys the back-end database, the airflow scheduler and the webserver.
echo "version: '2.1'
services:
  postgres:
    image: postgres:12
    environment:
      - POSTGRES_USER=airflow
      - POSTGRES_PASSWORD=airflow
      - POSTGRES_DB=airflow
    ports:
      - '5433:5432'

  scheduler:
    image: apache/airflow
    restart: always
    depends_on:
      - postgres
      - webserver
    env_file:
      - .env
    ports:
      - '8793:8793'
    volumes:
      - ./dags:/opt/airflow/dags
      - ./airflow-logs:/opt/airflow/logs
    command: scheduler
    healthcheck:
      test: ['CMD-SHELL', '[ -f /usr/local/airflow/airflow-webserver.pid ]']
      interval: 30s
      timeout: 30s
      retries: 3

  webserver:
    image: apache/airflow
    hostname: webserver
    restart: always
    depends_on:
      - postgres
    env_file:
      - .env
    volumes:
      - ./dags:/opt/airflow/dags
      - ./scripts:/opt/airflow/scripts
      - ./airflow-logs:/opt/airflow/logs
    ports:
      - '8080:8080'
    entrypoint: ./scripts/airflow-entrypoint.sh
    healthcheck:
      test: ['CMD-SHELL', '[ -f /usr/local/airflow/airflow-webserver.pid ]']
      interval: 30s
      timeout: 30s
      retries: 32
" > docker-compose.yml
I don’t want to go very in depth about how Airflow works because there’s just too many tutorials out there. Just search for ‘airflow tutorial’ on Google and you’ll find a bunch. I’ll limit myself to very simple explanations of how Airflow works.
Airflow has three components: a database, a scheduler and a webserver. The database hosts all information that is used by the scheduler and webserver such as how many tasks you have created, whether certain tasks failed on a given day/time and so on. It’s just that: a database for hosting all information needed by the other processes.
On the other hand, the scheduler makes sure that your tasks run on the start date and schedule that you’ve specified. This is the ‘cron’ part of Airflow. It speaks directly to the database we defined above to make sure we’re up to date on running everything. It won’t work if it doesn’t find the database we defined above because it needs to figure out whether certain tasks are behind schedule.
Finally, the webserver is a process for visualizing all of this in an intuitive way. Among other things, it creates maps of how your tasks are connected and shows the logs stored in the database in a convenient way.
docker-compose.yml hosts these three processes and allows them to speak to each other. I’ll focus on the important options from this docker-compose file.
The first service uses a PostgreSQL image tagged at version 12 and specifies the port at which will be used together with some environmental variables used to access the database:
postgres:
  image: postgres:12
  environment:
    - POSTGRES_USER=airflow
    - POSTGRES_PASSWORD=airflow
    - POSTGRES_DB=airflow
  ports:
    - '5433:5432'
This means that we don’t have to download the database engine, this image will host it directly. How can we be sure that Airflow speaks to this database? We haven’t linked them or anything, right? Well, think again! docker-compose creates a network between the docker images that we specify. Notice how we’re specifying the ports 5433:5432? We also specified those in AIRFLOW__CORE__SQL_ALCHEMY_CONN=postgres+psycopg2://airflow:airflow@postgres:5432/airflow. We’re slowly connecting the different parts we’ve been defining.
The next part of the docker-compose specifies the scheduler.
scheduler:
  image: apache/airflow
  restart: always
  depends_on:
    - postgres
    - webserver
  env_file:
    - .env
  ports:
    - '8793:8793'
  volumes:
    - ./dags:/opt/airflow/dags
    - ./airflow-logs:/opt/airflow/logs
  command: scheduler
  healthcheck:
    test: ['CMD-SHELL', '[ -f /usr/local/airflow/airflow-webserver.pid ]']
    interval: 30s
    timeout: 30s
    retries: 3
The image we use for the scheduler comes from the official Airflow docker image (apache/airflow). Remember that this scheduler will not work if it’s not connected to the database? We specify that in depends_on, saying that this image has to wait until these other containers are ready and deployed. Remember the .env file hosting the PostgreSQL and other environmental variables? We also specify it here because the Airflow image needs these to correctly know where to find things such as the PostgreSQL connection. As I said, I’ll only focus on the most important parts.
Volumes is perhaps the most important thing to explain here. Volumes are links between your local computer and the virtual docker container. This means that if I link my local folder ./dags/ to the container’s folder /opt/airflow/dags everything that is inside ./dags/ will be inside /opt/airflow/dags and viceversa. It essentially creates a mirror between the folders on your local computer and your container.
In this image we’re saying: anything that we put inside the folder dags needs to be placed in the container’s folder for dags. This is key because this is where you define your tasks that will be ran on a given schedule. We do the same with the logs because we might want to see the logs later on in our local computer.
The final part of docker-compose has the webserver.
webserver:
  image: apache/airflow
  hostname: webserver
  restart: always
  depends_on:
    - postgres
  env_file:
    - .env
  volumes:
    - ./dags:/opt/airflow/dags
    - ./scripts:/opt/airflow/scripts
    - ./airflow-logs:/opt/airflow/logs
  ports:
    - '8080:8080'
  entrypoint: ./scripts/airflow-entrypoint.sh
  healthcheck:
    test: ['CMD-SHELL', '[ -f /usr/local/airflow/airflow-webserver.pid ]']
    interval: 30s
    timeout: 30s
    retries: 32
This container shares a lot of similarity to the schedule container (same image, depends on the PostgreSQL container, passing the .env file) but there’s one thing that we should stop to explain: the entry point. Can you see that we’re linking our scripts folder to the a scripts folder within the container as a volume? This is because we will run the file airflow-entrypoint.sh once this container has been deployed. That is, docker already interprets entry points as scripts that it needs to run once it has been deployed; we just have to specify which script.
If you remember correctly, this entry point script ‘refreshes’ the database (through airflow upgradedb, which just checks up that everything is fine in terms of all tables available, connections, etc..) and deploys the webserver (through airflow webserver). The key thing here is that the entrypoint option for this container makes sure that all of this is ran once everything is deployed.
That is all for our docker-compose.yml file. This part is a bit tricky and if you don’t understand everything so far, it’s fine. You can ignore some of these details as this example you’re developing should work out of the box. However, if you’re planning to use Airflow for serious projects which might hold sensitive data, you should study this in depth.
- Create your tasks that will be executed on a schedule
echo "from datetime import timedelta, datetime
from airflow import DAG
from airflow.operators.python_operator import PythonOperator
from airflow.operators.dummy_operator import DummyOperator

# Define default arguments for the DAG
default_args = {
    'owner': 'cimentadaj',
    'depends_on_past': False,
    'start_date': datetime(2020, 12, 7, 13, 20),
    'email': ['airflow@example.com'],
    'email_on_failure': True,
    'retries': 1,
    'retry_delay': timedelta(seconds=5)
}

# Define the main DAG: this is a general
# process that can have many tasks inside
dag = DAG(
    'tutorial',
    default_args=default_args,
    schedule_interval='*/1 * * * *',
)

# Define what task_1 will do
def task_1():
    'Print task 1 complete'
    print('Task 1 complete')

# Define what task_2 will do
def task_2():
    'Print task 2 complete'
    print('Task 2 complete')

# Create initial empty task
task0 = DummyOperator(
    task_id='start',
    dag=dag
)

# Create task1
task1 = PythonOperator(
    task_id='task_1',
    python_callable=task_1,
    dag=dag
)

# Create task2
task2 = PythonOperator(
    task_id='task_2',
    python_callable=task_2,
    dag=dag
)

# Create dependencies between tasks.
# task0 is first, then task1 then task2
task0 >> task1 >> task2
" > dags/airflow-test.py
The above is some Python code which we save to dags/airflow-test.py. I wouldn’t do justice to the superb explanation of how to create a DAG file as the Airflow team has done so I’ll limit myself to briefly explaining what I did in the example above.
After loading the Airflow module I set some default arguments which you should update accordingly with your details (owner name, email, start_date, etc..). I then defined the DAG name as ‘tutorial’ where I specify schedule_interval, which has the cron expression for when to run this task (I set it to every minute of every day of the year). I then define some Python functions that I use with the PythonOperator to create the Airflow tasks.
Once you have your tasks created you can create the dependencies between these tasks. For example, by writing task0 >> task1 >> task2 I’m saying that task2 depends on task1 and task1 depends on task0. Or the other way around: we begin with task0, once it’s finished we follow with task1 and once that’s done, we continue with task2. Depending on another task in this context means that only when a given task has ended, the other task will begin. This creates a beautiful framework for creating complex dependencies in no time.
Airflow has different operators for different languages, and if your preferred language is not present, the BashOperator makes it easy to run anything not covered (such as R or Julia, for example).
Remember that we linked our dags folder to the container’s dags folder so anything we add in this folder will be automatically synced to the container.
Putting everything together
Before we deploy everything, we need to make sure that this entire folder has all permissions available. Due to some issues I’ve yet to understand, our containers can have some permission problems while trying to access the volumes we specified between our local computer and the containers. Let’s give full access to everyone for that folder:
sudo chmod -R 777 $TEST_DIR/airflow_test2With that out of the way, deploy everything with docker-compose up -d:
docker-compose up -d# Creating network "airflow_test2_default" with the default driver
# Starting airflow_test2_postgres_1 ...
# Starting airflow_test2_webserver_1 ...
# Starting airflow_test2_scheduler_1 ... How would all of this look like? Visit the website http://localhost:8080/admin/.
You should see something like this:
We can toggle our task to start, inspect the dependency of the different tasks and also begin the process manually. Below is a GIF showing you how to do it. Make sure you click on the image for the GIF to start:
Conclusion
This was a long post because I wanted to touch upon several details related to Airflow. However, if you want to just make this work, you can copy the worked out example from the beginning and edit your tasks accordingly. I hope this was useful!